Game Boy Camera Adventures with an F-Mount Adapter
Phoebe Conetits
Sep 30, 2025
Updated May 6, 2026
I designed and 3D-printed a Nikon F-mount lens adapter for a Game Boy Camera. This project involved many more pieces than I anticipated, and this writeup took much longer to complete than expected because its scope kept expanding. But I am pleased with the results of my calculations. The angular resolution is consistent with my napkin math prediction. The crop factor arguably deviates from my prediction, but the calculations are based on imprecise data, so the deviation is likely not significant.
In addition to the 3D-printed adapter, I needed an Arduino-based tool to copy data from the Game Boy Camera and software to process the data into photos. I've provided a modified copy of the tool that I found because I added a few features while working with it. Finally, I uploaded some pictures to a gallery.
Specs and Historical Context
The Game Boy Camera was released in 1998 alongside the Game Boy Printer and is notable for being one of the first consumer digital cameras and probably the first cheap consumer digital camera. It cost $50 at launch, and alongside the street price of a Game Boy Pocket, it cost just $100 to take pictures plus an extra $60 to print them. An entry-level Sony Mavica in the late 1990s would have cost around $500 or $600 depending on the model for comparison.
The Game Boy Camera features a fixed-focus lens and an image resolution of 128 × 112 with a bit depth of 2 bits. It has 14 kilopixels to work with, and they can each be black, dark grey, light grey, or white. The camera software is able to apply dithering to pictures because the Mitsubishi M64282FP, the image sensor within the Game Boy Camera, in actuality has a bit depth of 8 bits. Enabling dithering gives photos a few more shades of grey as long as you squint. The silver lining to such a low-resolution sensor with so much brightness data discarded is that each photo is very small, so the cartridge can save 30 despite having one lonely megabit of battery-backed SRAM for storage. A standard 3.5" floppy disk is cavernous in comparison; one stores nearly 12 times as much data. (Sony)
The Game Boy Camera is pretty much the minimum viable digital camera that can take recognizable photographs. I generally agree with the axiom that a photographer's skill, judgment, artistry, and so on are more important than their gear, but this thing is an edge case. And 1998 was probably the earliest time it was possible to sell this edge case at this price point. Remember, sensor resolution follows Moore's LawMoore's Law claims that transistor density in microchips doubles every two years, and both the cost and performance of a microchip are immediately downstream of this metric. because sensors, like microprocessors, are silicon chips that make heavy use of MOSFETs to function. A Game Boy Camera released a few years earlier would've been too low-quality or too expensive to be commercially successful.
Motivation for the Project
I read a blog post a few years ago by a man who 3D-printed a Canon lens adapter, (Ekeler 2018) and I thought it was really cool and wanted it to try it myself. In general, I'm a sucker for slapping a long focal length lens on anything even if the high crop factor produced by a tiny sensor feels like cheating. I'm also a sucker for crap sensors paired with good glass in general. I love the asymmetry. (Film)
Workflow
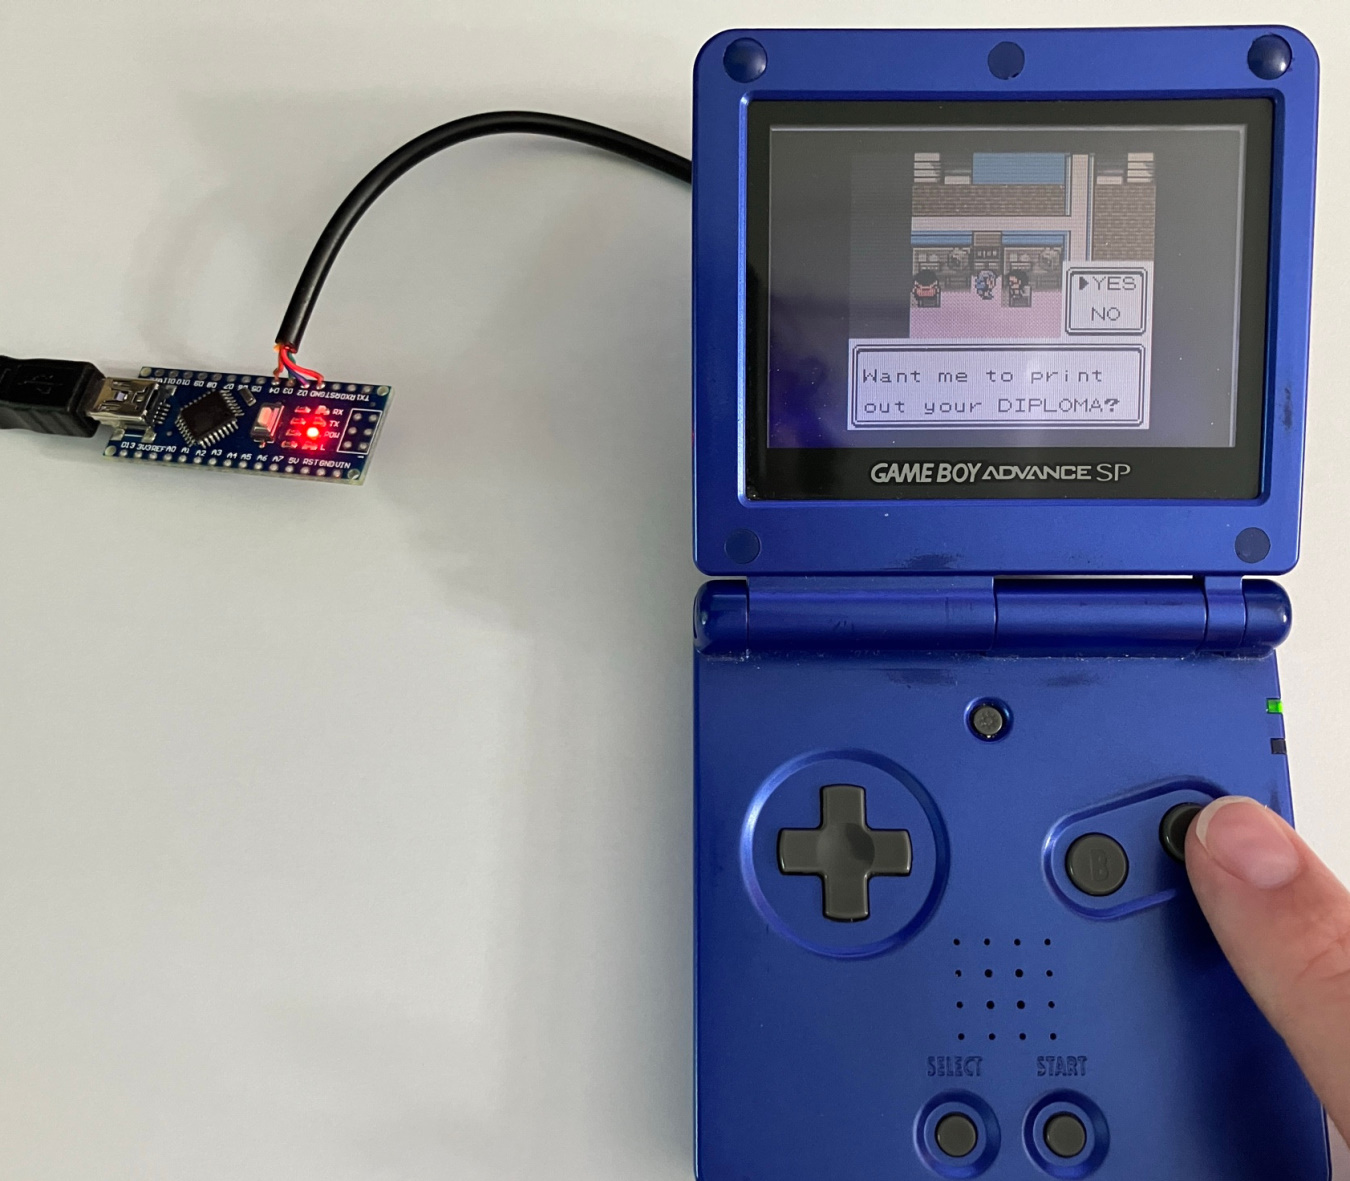
Taking pictures with a Game Boy Camera is easy enough, but there's a hurdle immediately: the Game Boy doesn't have any means to communicate over any standard computer bus. Thankfully, getting pictures transferred to a computer is easy albeit time consuming. I open Paint and copy each and every pixel manu— hahahaha, I'm kidding, I have a gadget for it.
This cute li'l device is a Game Boy Printer emulator that features an Arduino with a USB cable on one side and a Game Boy Link Cable on the other with software available from Github. (Mofosyne 2023) Assembly is trivial: cut a Link Cable, identify which wire goes to which pin, and solder four of those wires to four pads on the Arduino. I actually got confused because I couldn't find a circuit diagram before I started the assembling adapter and assumed it needed something like a pull-up resistor or a filter capacitor or something. Nope! Just four wires. (Ground)
-
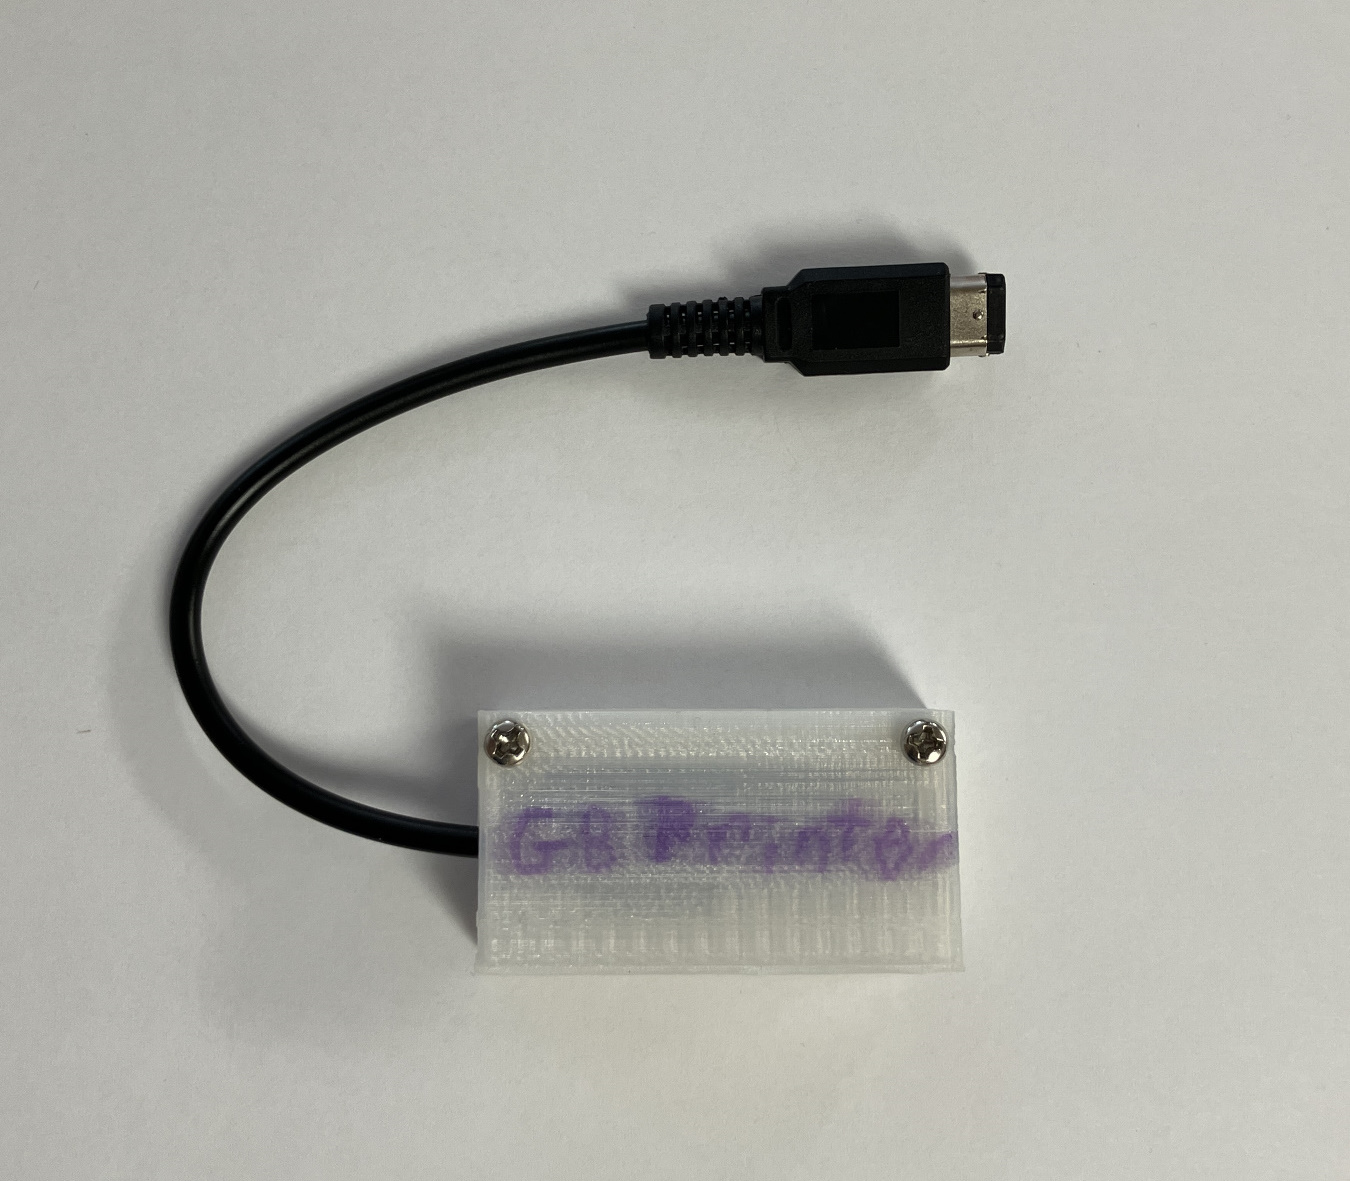
An Arduino Nano with a Link Cable pigtail plugged in to a GBA playing Pokémon Crystal. -
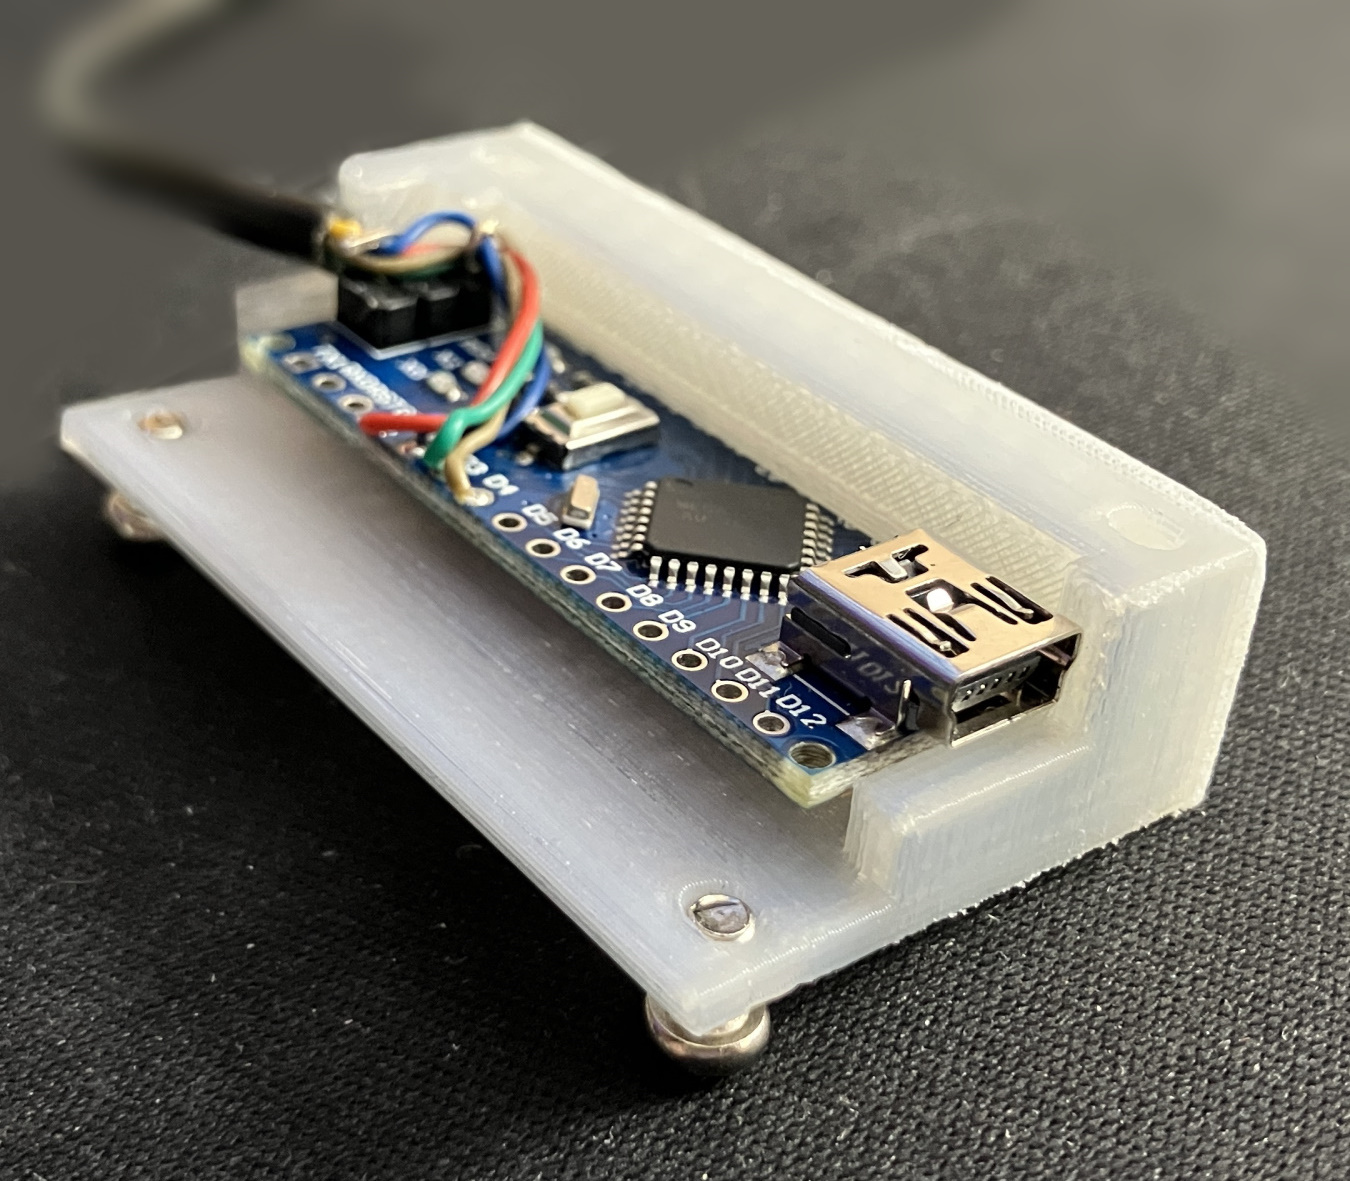
The Arduino from the previous photo in the bottom half of a 3D-printed enclosure. -
The assembled Arduino Game Boy Printer emulator. Its mini USB port is accessible but not visible in the picture.
The repo also links to instructions for setting up PuTTY (PuTTY) to communicate with the Arduino. With PuTTY open and the printer emulator connected to both systems, pictures can be accessed in the Game Boy Camera's album and "printed." The camera dutifully transmits data to what it believes is a printer, and the Arduino forwards it to a computer where it's logged to a file.
But we're not done because the log file isn't an image file; it's a byte stream. The data can be copied as plaintext into the final tool: a webpage featuring Javascript that converts it to HTML canvas images that can be downloaded. It's not exactly an elegant workflow, but despite everything it's easy to set up. The Arduino code compiled and ran on the first try, and PuTTY and the Javascript tool Just Work™.
I've made a few changes to a Javascript decoder tool included in the repo to allow custom scale factors and custom color palettes. The original tool has a hardcoded 3× upscaling ratio and about a dozen hardcoded palettes. I've hosted the tool on this website as a single HTML file with Javascript embedded. It's linked at the top of the page and can be saved in one .html file by hitting Ctrl+S or Cmd+S. Possible future work includes adding options to omit the border or add a variety of scanline-esque overlays as described in the next section.
Image Quality
Photos look surprisingly good on a Game Boy Advance's screen in a way that they don't on a computer monitor after exporting. Zooming in to the GBA's screen reveals a possible reason why.
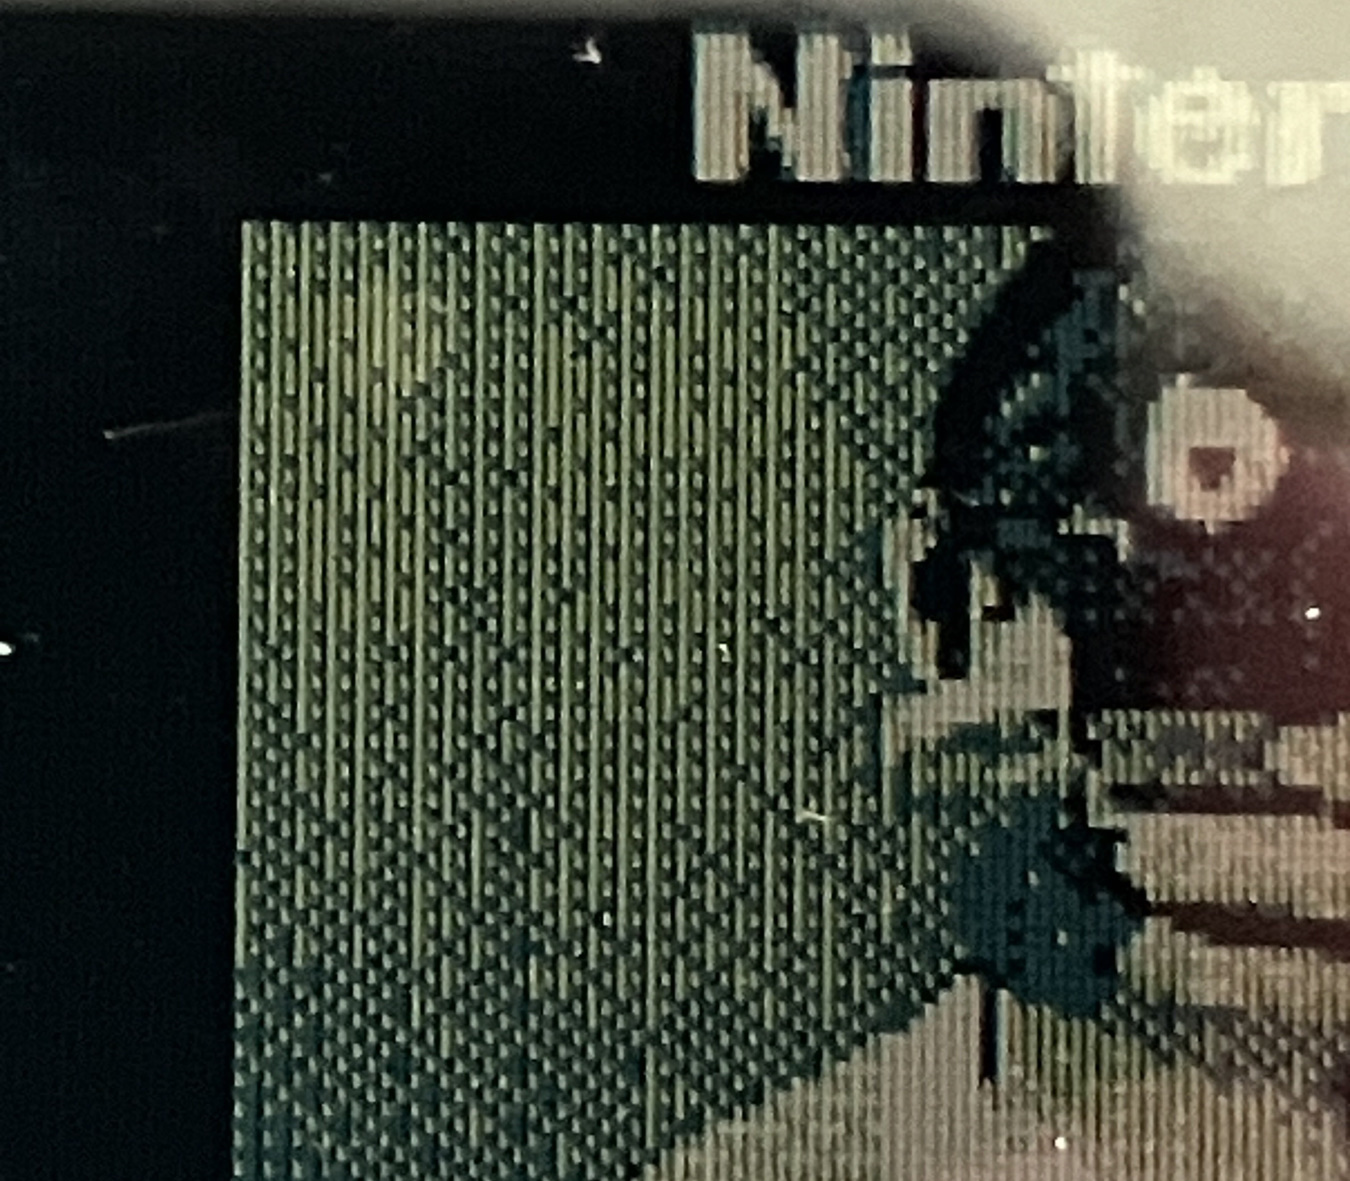
Each column of pixels is followed by a vertical dark band. I believe this is because the GBA has a color screen but, when playing Game Boy games, uses 4-color palettes. A palette is not necessarily greyscale, so some subpixels can be lighter or darker than others, and the palette when running the Game Boy Camera's software is greenish presumably to resemble the original Game Boy's screen. I suspect that the bands are caused by subpixels (probably the blue subpixels?) remaining dark.
Something that I can't explain about this banding makes pictures look more detailed than they actually are. (AI upscaling) I guess the dark gaps provide space for the brain to fill in blanks and break up the obviously-low-resolution bitmap? I dunno. The effect can be replicated easily on a modern display by overlaying a PNG consisting of partially-transparent lines. Take a look at the results below. In my opinion, the second image resembles the GBA's screen the best, and the third image is too dark. Thus, gallery photos have been edited like the second one.
-
A four-color bitmap featuring 3× nearest neighbor upscaling. -
The previous image with 50% transparent black lines overlaying the 3rd, 6th, 9th, etc. columns. -
The first image with a 50% transparent black grid overlaying the 3rd, 6th, 9th, etc. rows and columns.
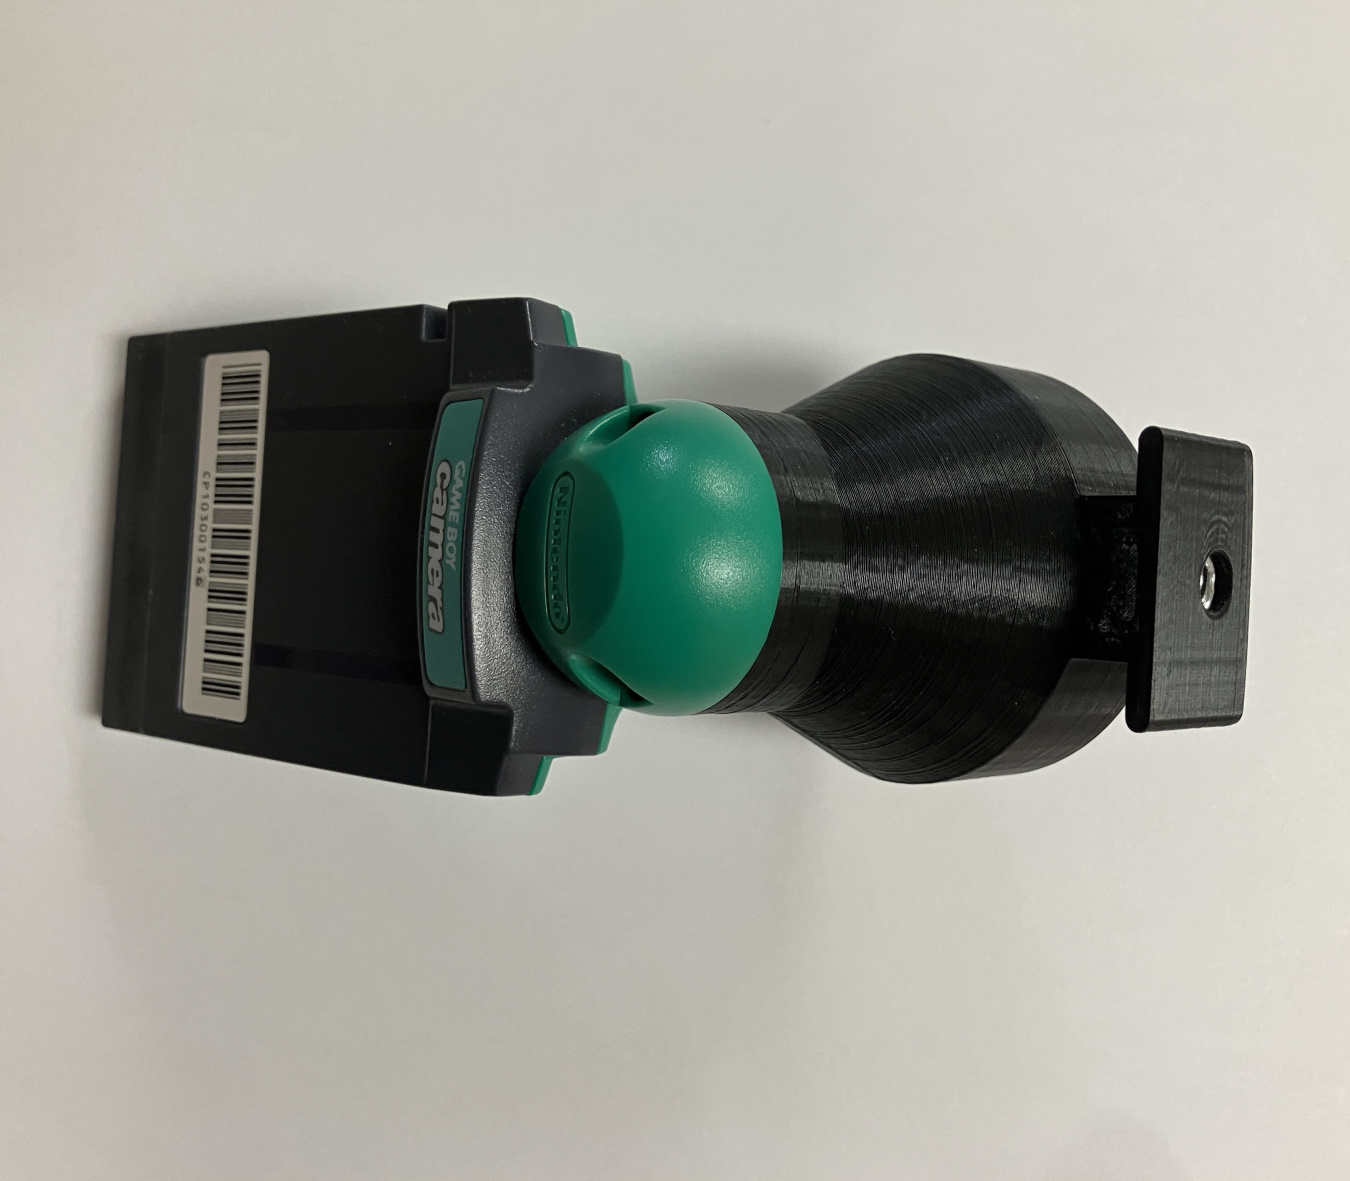
Adapter
The lens adapter is currently on its fifth revision. It's derived from a Game Boy Camera adapter designed for use with Canon EF lenses, (Herr_Zatacke 2020) but mine has been modified to take Nikon F lenses instead. I also added a housing for a nut compatible with most tripods. Tripod compatibility is important because the sensor has a high crop factor and turns every lens into essentially a telephoto lens, so steadying the camera or framing objects is difficult handheld.
This adapter is designed for use with a GBA SP specifically. Game cartridges are inserted into the bottom of the GBA SP whereas they're inserted into the top of any other Game Boy model. The tripod nut housing is positioned such that, when the Game Boy Camera assembly is mounted to a tripod, the cartridge is inverted versus its intended orientation, pointing upwards rather than downwards. This means that only the GBA SP can be attached to the cartridge in the correct orientation. In order to compensate for the now-inverted cartridge, the sensor board deck in the adapter is designed so the sensor relative to the cartridge is inverted when installed. Both of these inversions cancel out, and the sensor itself remains in the correct orientation when the entire Game Boy Camera assembly is mounted to a tripod.
-
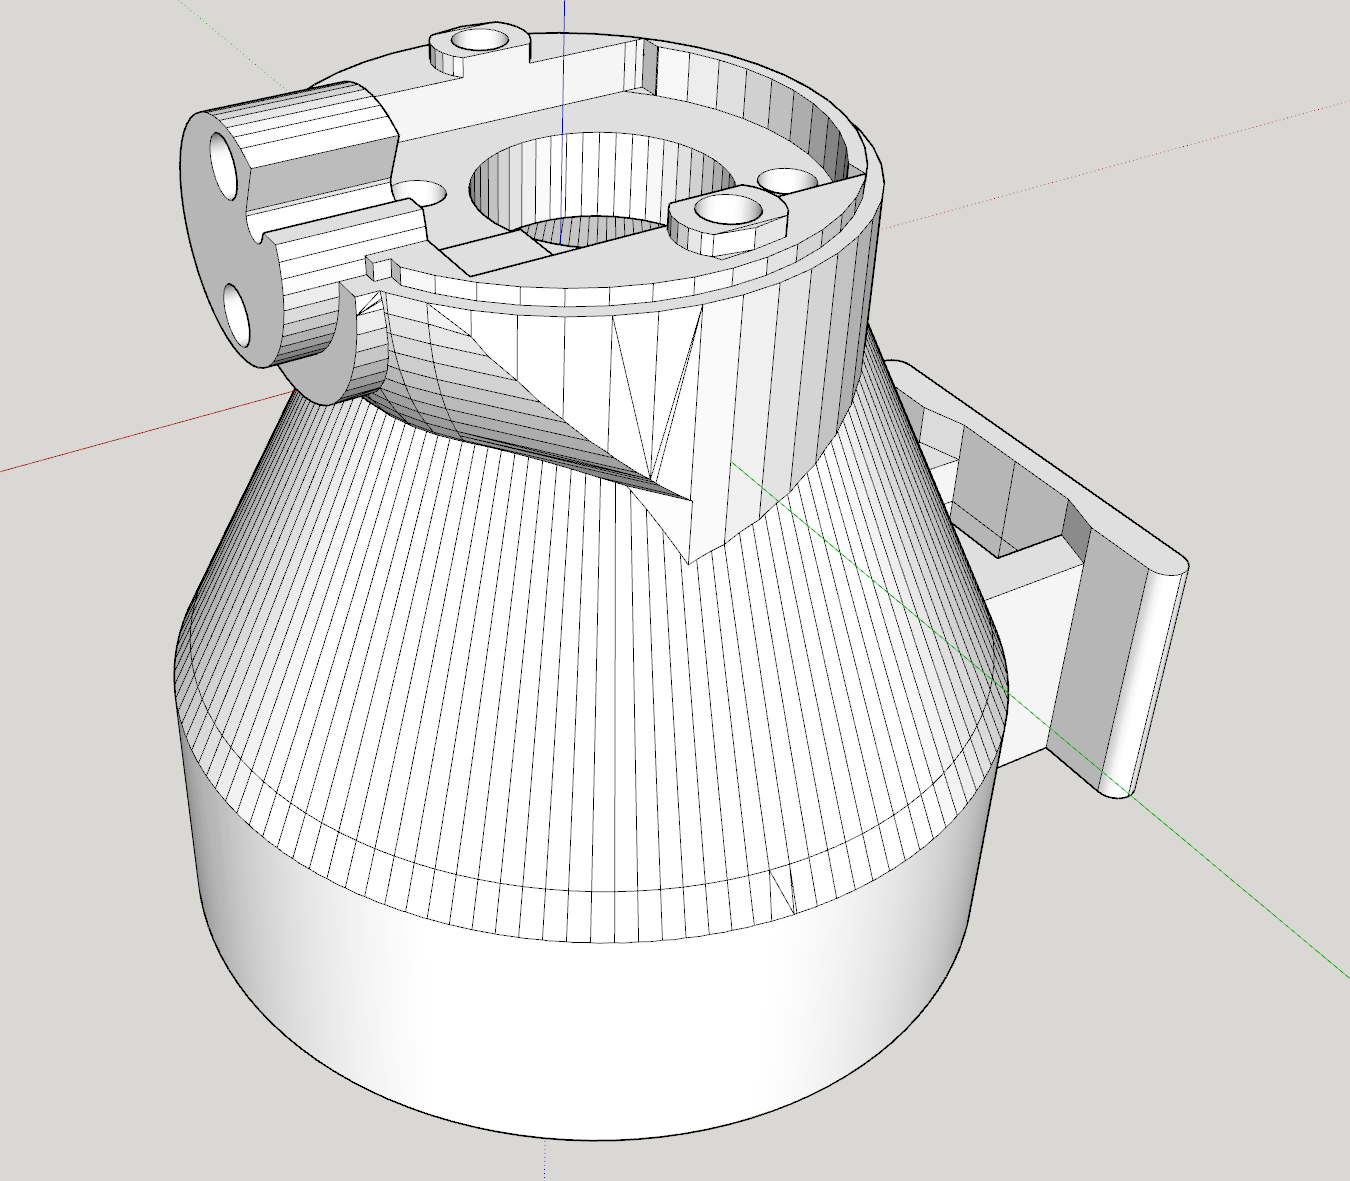
The top of a 3D model of the current version of the lens adapter. The sensor board is attached to this side. -
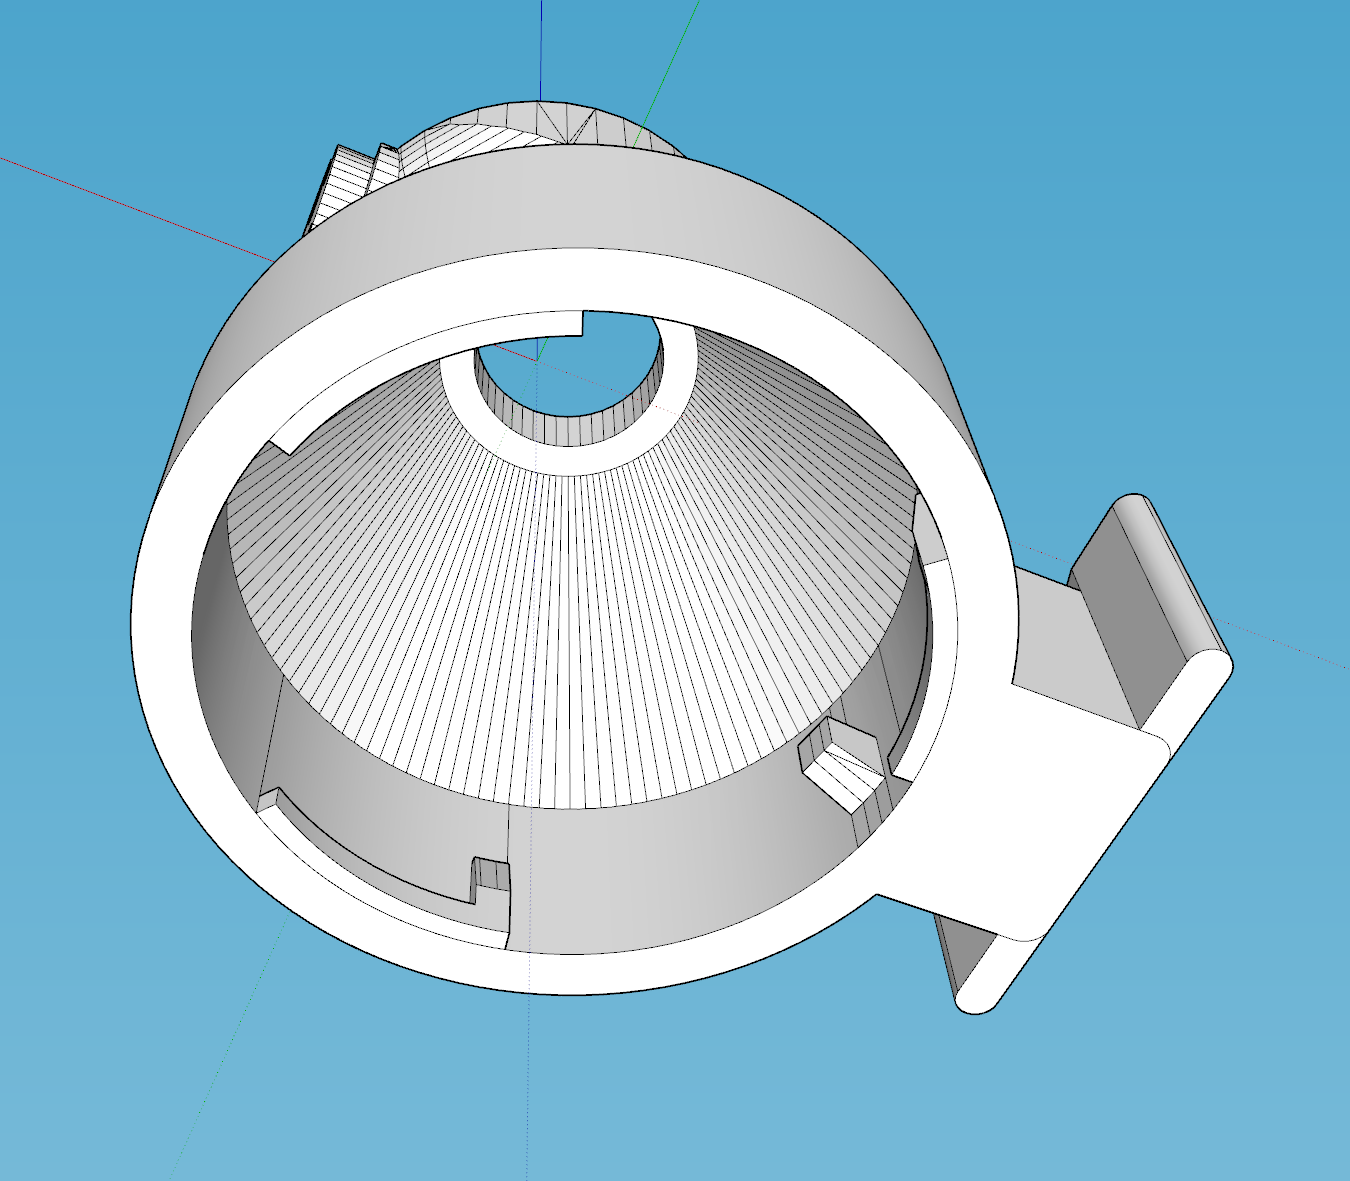
The bottom of the 3D model. A block on the inner wall is visible, and this opens the aperture of Nikon G-type lenses. -
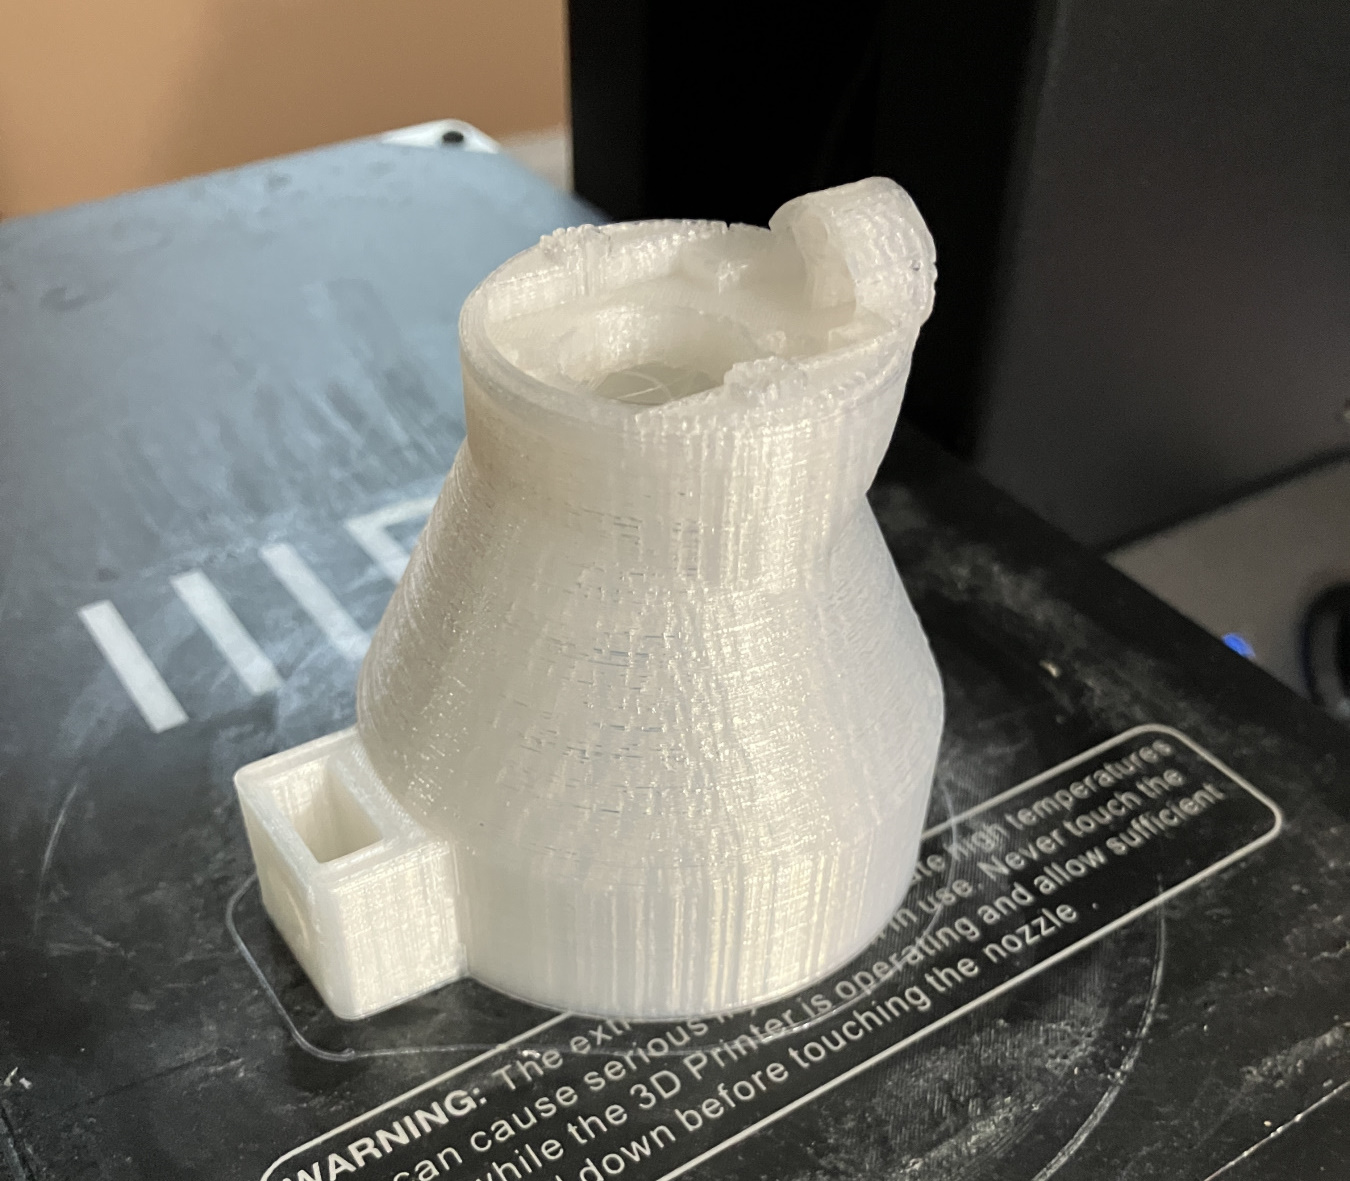
A freshly-printed lens adapter. I believe this was the first revision of the adapter. It's missing some features that I would add later. -
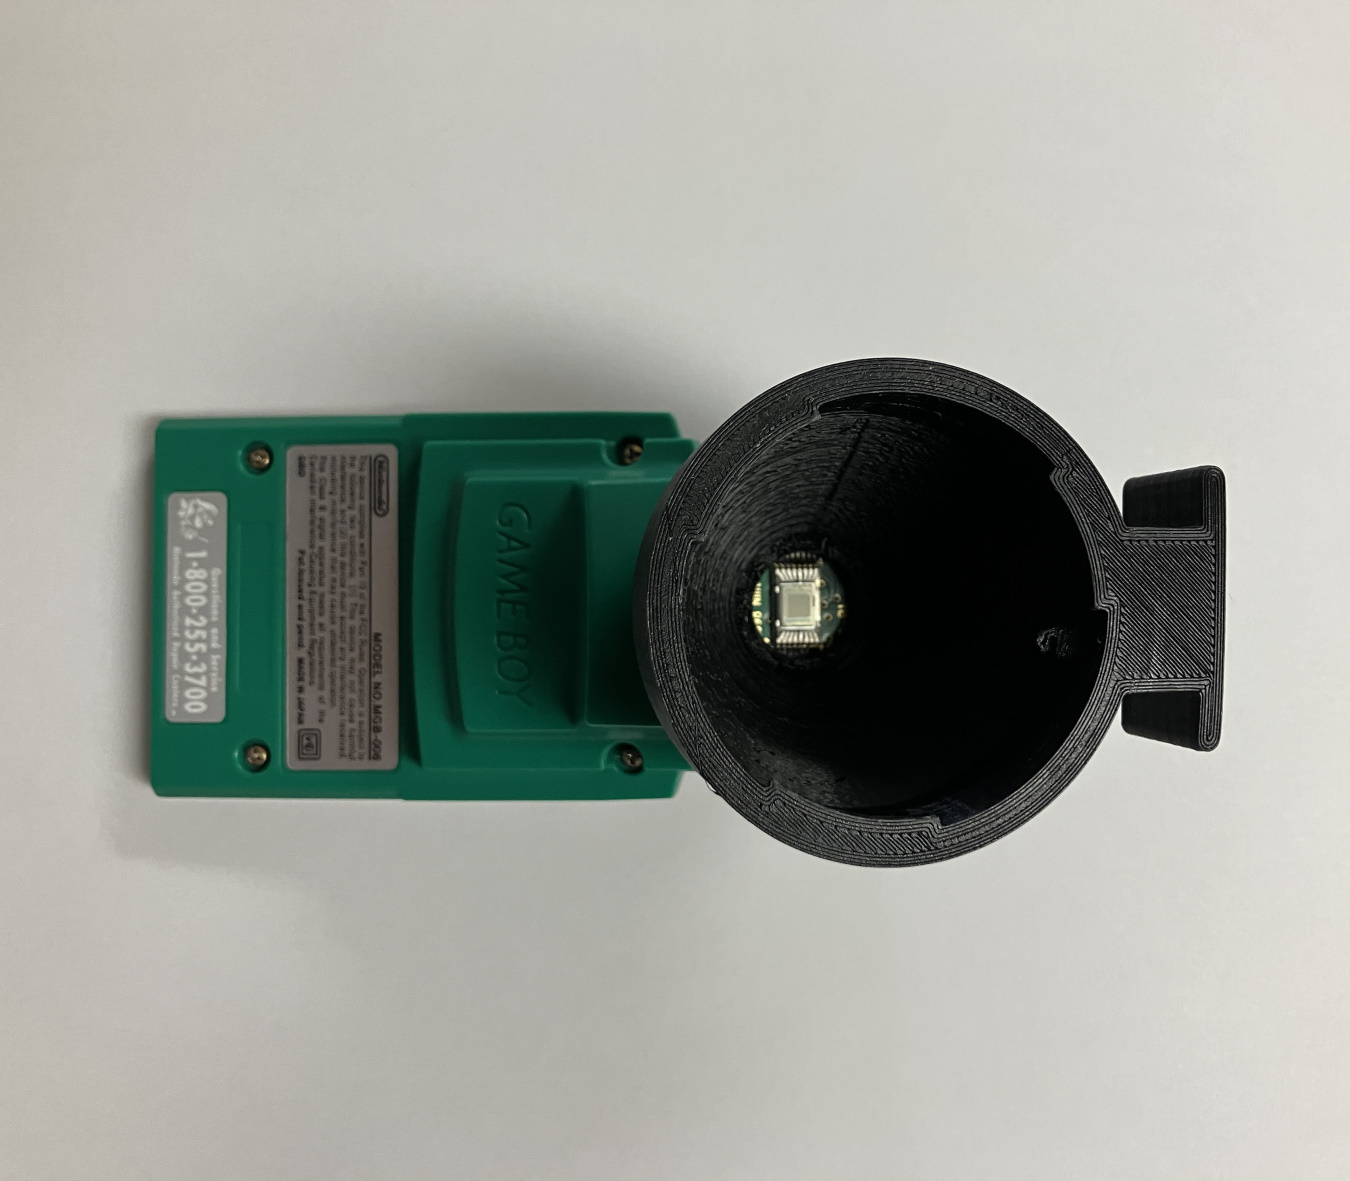
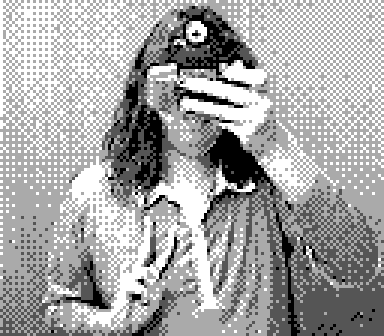
The assembled lens adapter on a Game Boy Camera. The sensor is visible. -
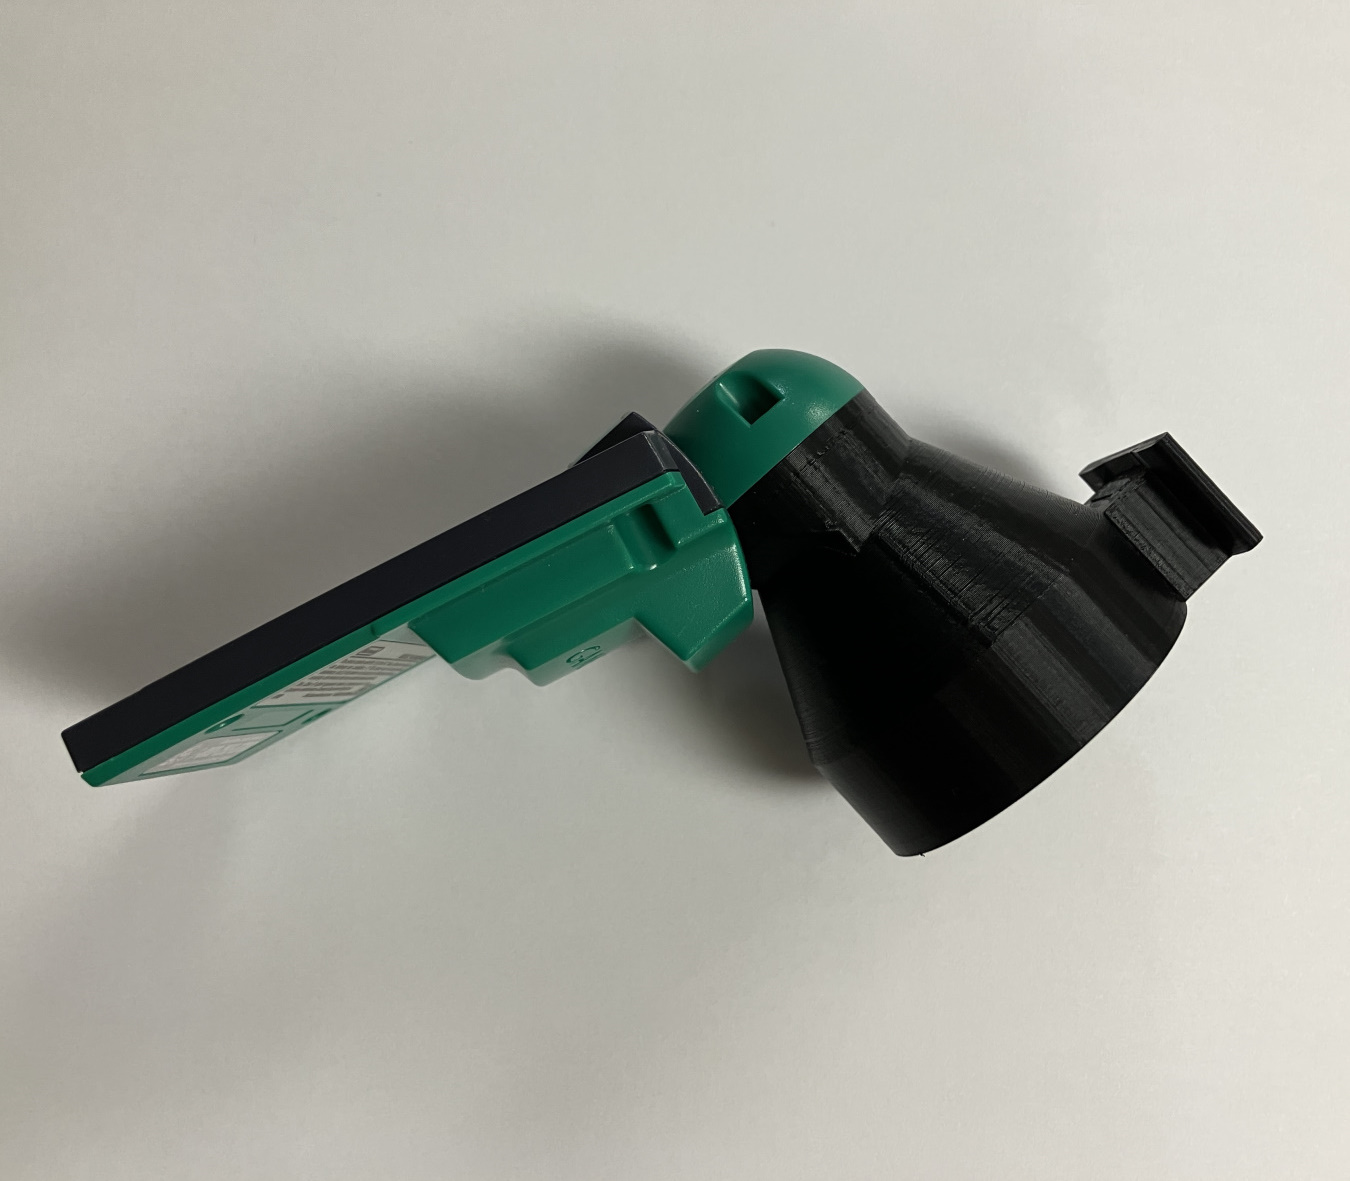
Side view of the assembled camera. -
Top view of the assembled camera. -
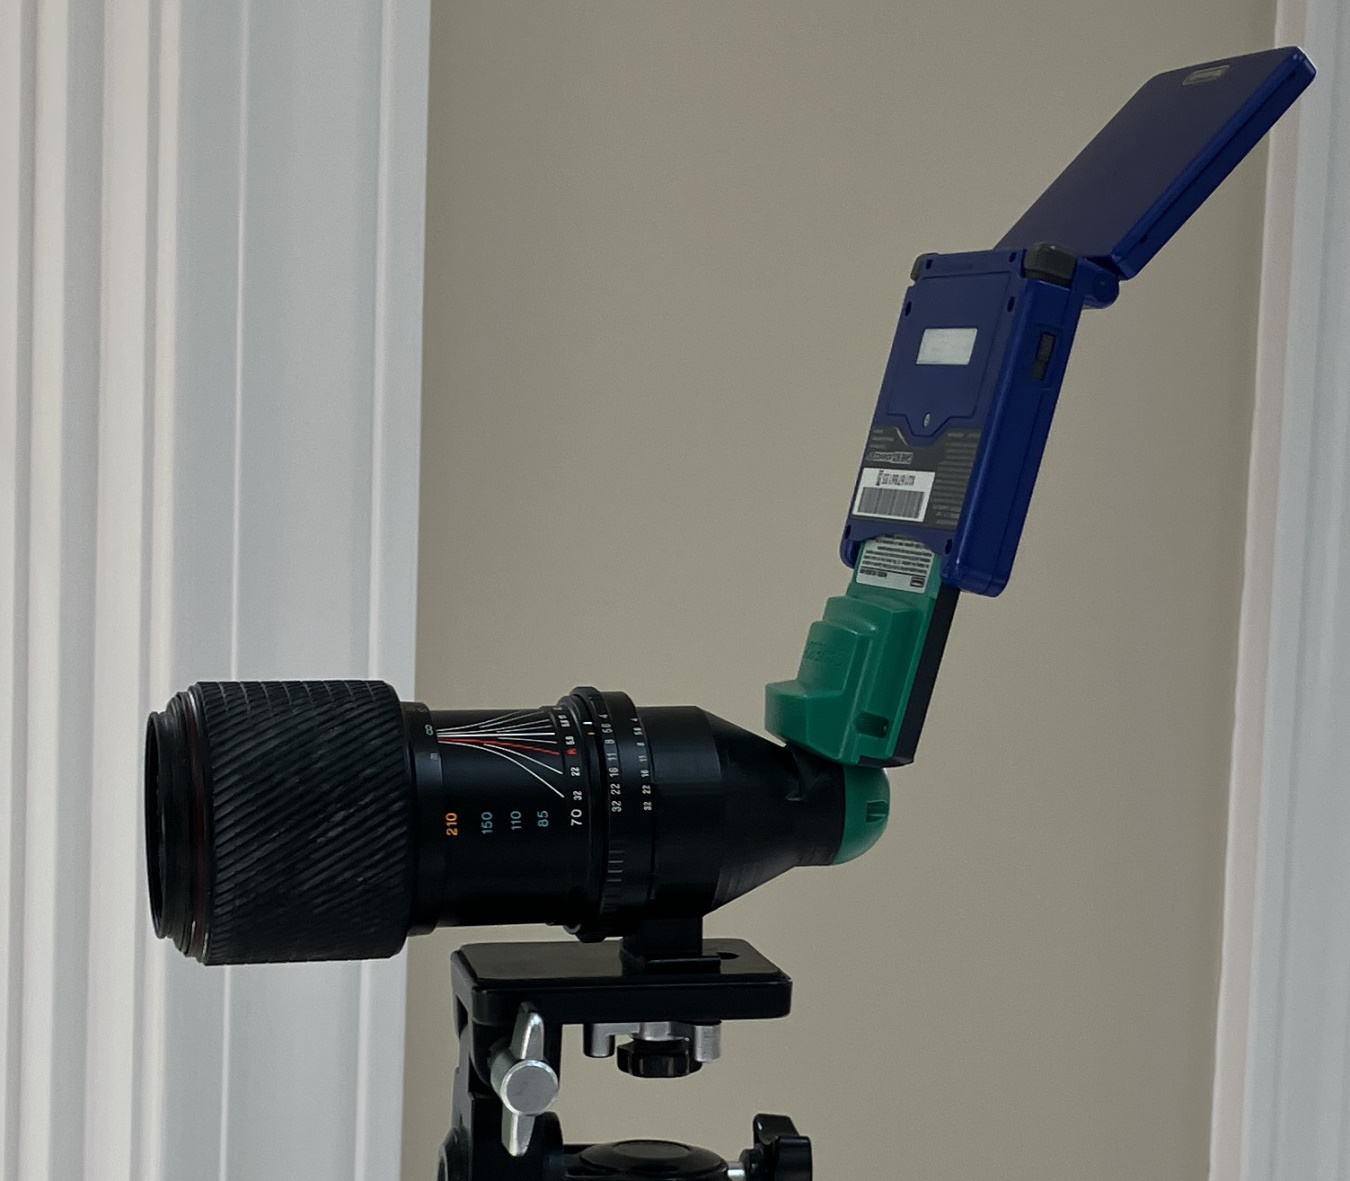
The fully-assembled F-mount Game Boy Camera on a tripod with zoom lens and Game Boy attached.
This will not be the final revision. At a bare minimum, I'll need to reprint the existing model because the plastic bayonet connector has worn out already after changing lenses maybe a dozen times. The adapter design has two major design flaws, and this is the first: plastic is a terrible material to use for a lens bayonet connector and I'll encounter the exact same problem exactly as fast. Additionally, the adapter does not feature a proper retention mechanism and relies purely on static friction. Thus, I would like to use some kind of metal F-mount connector. I've actually considered printing the original Canon EF adapter and permanently attaching an F-mount lens-to-EF-mount body adapter because in addition to metal construction, these tend to feature their own retention mechanisms.
Second, the fifth revision features a small block of plastic inside the adapter that engages with lenses' aperture levers and fully opens them when installed. This is not appropriate in all lighting conditions; I got lucky with some of the photos in the gallery due to the time of day, time of year, and direction the camera was facing. However, I am not sure how to add a mechanism to manually control lenses that do not have their own levers or dials. This is another point in favor of using an F-mount-to-EF mount adapter; I have seen some for sale that include manual aperture control for G-type lenses that lack an aperture ring but are still controlled electromechanically by the camera body.
I have some nitpicky changes in mind to improve the tripod mount and cleanliness of the print, but nothing major. Durability and aperture control are the most important ones. If I figure those out, then I'd also like to design an alternate version for use with a standard GBA that takes advantage of the clips around the Link Cable port that were used for the Wireless Adapter and the GBA-to-GameCube Link Cable for extra stability.
Calculations
I wanted to determine some of the camera's specifations now that it uses proper lenses. Using a couple of known quantities and a photo I've taken previously using a Nikon D100, it is possible to estimate and compare the Game Boy Camera's crop factor and angular resolution. (Moon)
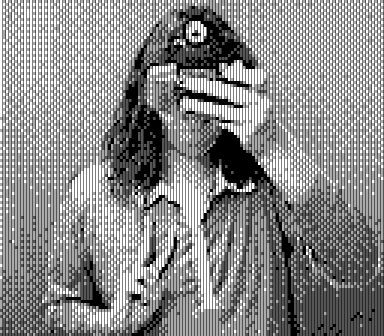
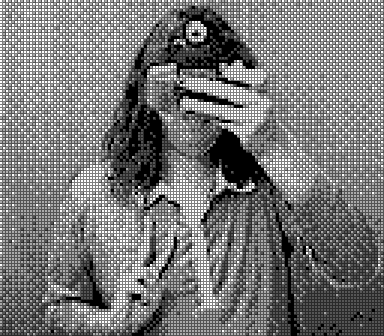
The CCD in the Nikon D100 uses the Nikon DX format, which is Nikon's brand name for their APS-C image sensor format. This CCD has dimensions of 15.6 mm × 23.7 mm and a crop factor of 1.52Raw value: 1.524900458590056. A cropped photo taken of the Louisville skyline from the Lewis and Clark Bridge in 2021 is shown below. This photo was taken using the same 70–210 mm Tokina lens mounted to the Game Boy Camera in the last picture in the previous section.
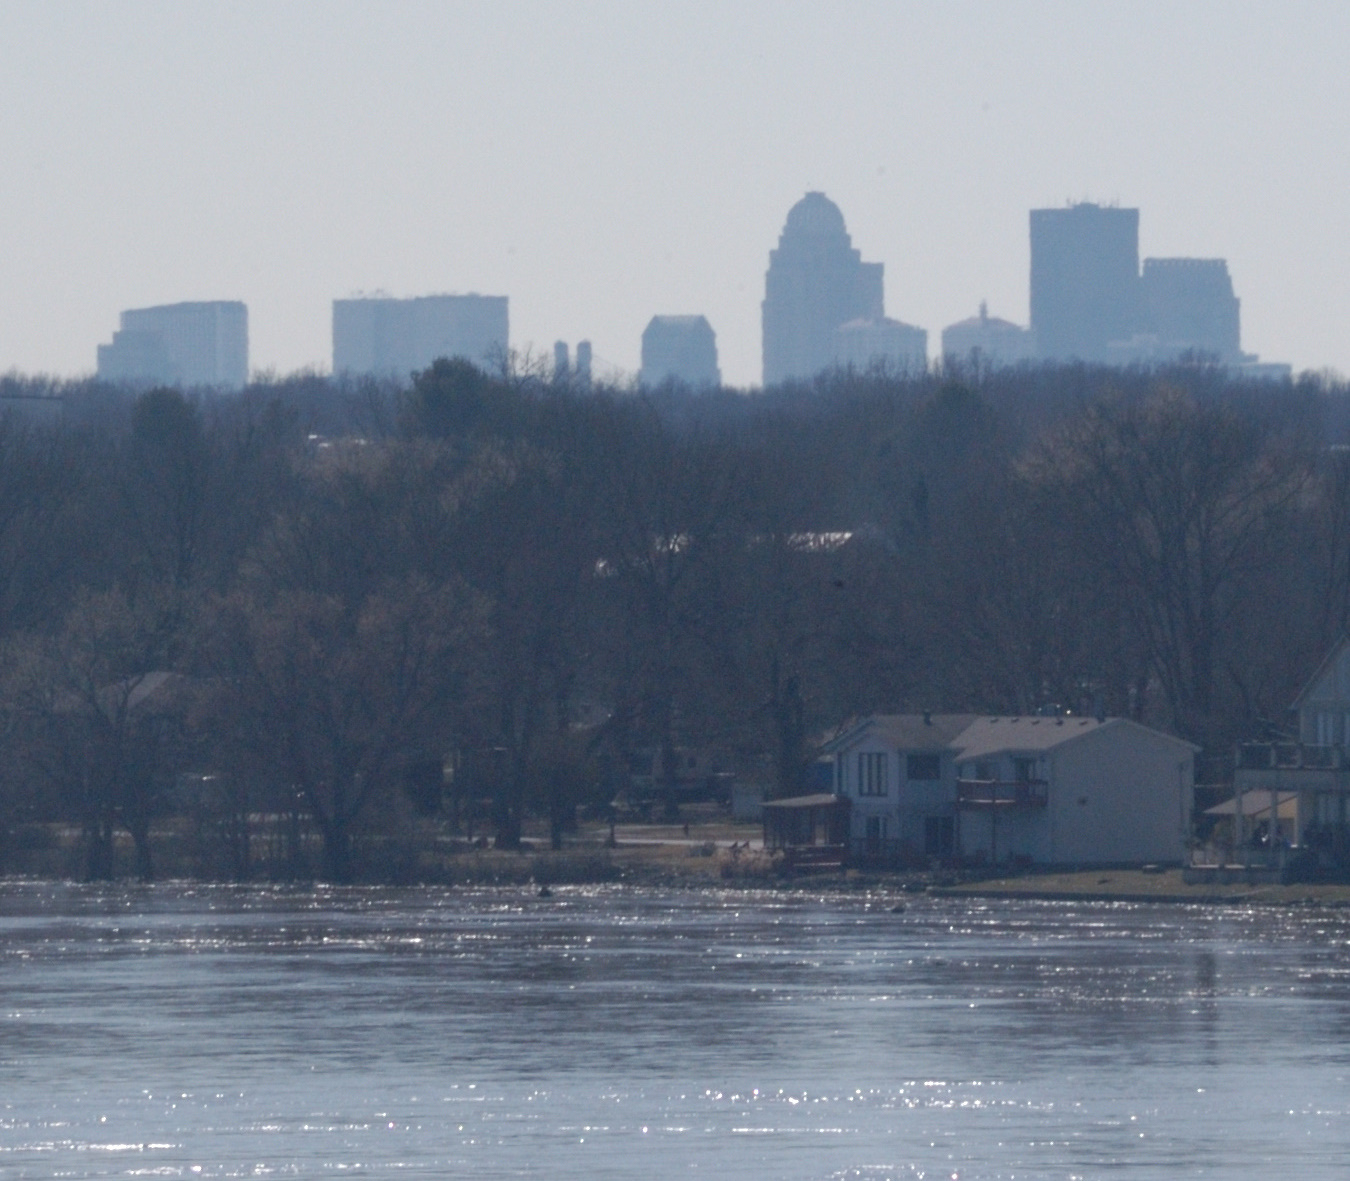
The domed building is 400 West Market, the tallest building in Kentucky. It was formerly known as the Capital Holding Building, Providian Center, and Aegon Center as ownership changed hands over the years. It is 549 feet tall, and—importantly—its dome's silhouette is easy to spot at a distance and is known to be 85 feet tall.
In the photo, the dome is 44 pixels tall. Dividing the known height of the dome in feet by the measured height of the dome in pixels gives a resolution of 1.9Raw value: 1.9318181818… feet per pixel in this image.
A photo of 400 West Market taken using the Game Boy Camera with the lens adapter is shown below. The crop factor of the Game Boy Camera is so absurdly high that I actually cannot photograph the entire skyline at full zoom.
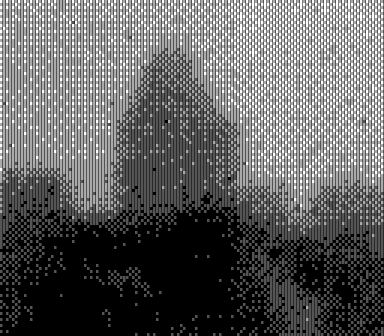
The dome is 15 pixels tall in this photo, but between the mediocre quality of the glass and the haze over a few miles of the river, it's hard to tell exactly where the dome ends and the sky begins. Dividing the known height of the dome by the measured height in pixels gives a resolution of 5.7Raw value: 5.66… feet per pixel. This is about a third the resolution of the D100, which while lower is still hilarious given the fact that the diagonal resolution of the D100's sensor is twenty-one times the resolution of the Game Boy Camera's.
The two photos were not taken at the same spot on the bridge, but coincidentally, in both instances I was 8.64 miles from 400 West Market. An annotated Google Maps screenshot is shown below.

The distance to the dome is several hundred times greater than the height of the dome, so using the small angle approximation is appropriate here. The dome is 0.00186Raw value: 0.0018632505611672 radians tall at this distance, which converts to 6.41Raw value: 6.405383599809637 arcminutes. The angular resolution of the Game Boy Camera with the 70–210 mm Tokina lens at 210 mm is 26 ± 2Raw values: 25.62153439923855 + 1.6013459 / - 1.8301096 arcseconds per pixel, which works out to 1.2 ± 0.1 degrees diagonally for the full image. The D100, meanwhile, achieves a resolution of 8.7 ± 0.2 arcseconds per pixel and 8.8 ± 0.2 degrees diagonally for the full image.
The crop factor can be determined by simply multiplying the crop factor of the D100 by the quotient of the angular diagonal width of a D100 photo divided by that of a Game Boy Camera photo. The crop factor comes out to 11.0, which is consistent with the fact that the Mitsubishi M64282FP CMOS sensor in the Game Boy Camera is a quarter-inch type sensor, and such sensors have nominal crop factors of 10.81.
Error is present since the data used to calculate the crop factor can ultimately be traced back to counting pixels in low-resolution photographs taken in suboptimal conditions. If the height of the dome in pixels is allowed an error of one pixel in either direction in both photos, then at the extremes (i.e., the D100 and Game Boy Camera photos both feature measurement errors in opposite directions) the crop factor is actually 11 ± 1.
Nonetheless, using the computed value of 11, the equivalent focal length of the Tokina lens attached to the Game Boy Camera is…
2300 millimeters!
Two-point-three meters! A 35 mm camera would need a lens with a focal length of seven and a half feet to frame a shot the same as the Game Boy Camera with a 210 mm zoom lens.
Of course, the film camera would actually capture things such as "details," and if digitized, good quality film stock could probably achieve a resolution of around 50 Game Boy Camera photos by 40 Game Boy Camera photos, but good luck hauling that lens around.
Conclusion
The Game Boy Camera is not good. The Game Boy Camera with real glass is less not good. But it is interesting, and "good" isn't the point, is it?
This thing almost feels like the anti-smartphone camera. Smartphones gleefully advertise their hundred-megapixel sensors, but they're tiny and behind terrible lenses, and whatever sensor data is there is post-processed to hell and—at this point—may very well be at least in part generative AI. (Li 2024)
The M64282FP on the other hand is barely 1% of a megapixel. The Game Boy's screen ditches 75% of the brightness data, and the only post-processing is dithering that desperately tries to add some of it back. If any part of any of the photos in the gallery look good, it's not because of but in spite of this sensor.
It's all in the optics. You can't compensate for bad optics.
There's one more project I'm tempted to build, but I have mixed feelings about it. The Dashcam is a Raspberry Pi Pico-based camera that uses the Game Boy Camera's sensor board and chassis; (Boichot 2024) it is also compatible with this lens adapter. The Dashcam takes advantage of the full 8-bit brightness resolution of the M64282FP and produces photos that are genuinely stunning because they were never supposed to have the level of detail that they do.
However, the Dashcam also eliminates the workflow. Replacing battery-backed SRAM and a slow proprietary serial port with a regular ol' SD card formatted to regular ol' FAT32 that can hold, no exaggeration, millions of photos feels wrong. It's sacrilegious to eliminate the '90s jank. The Game Boy Camera was a toy designed in an era predating cheap and abundant NAND flash, and yeah, the tech of that era largely sucked, but is that not part of the point revisiting it now?
I can only show you the photos I take. I can't show you my satisfaction as a lens locks onto a camera it was never designed for. I can't show you my excitement seeing a long-distance object come into focus on a Game Boy screen. I can't show you my anticipation watching a terminal window fill with data. Streamlining the workflow to remove the steps that involve "playing" a Game Boy game may yield better results, but the process loses its charm. Unfortunately I can only show you the results, not the process.